
 UI组件库与项目实战
# UI组件库与项目实战
实际项目中通常使用现成的 UI 组件库来加速开发。本章介绍 Element Plus、Ant Design Vue 两款主流组件库的引入和使用,并配合地图接入和小项目实战巩固所学。
# Vue3 小项目实战
用所学过的 Vue3.0 双大括号文本插值、条件、循环渲染指令、表单数据双向绑定、计算属性和事件响应等相关知识,来开发一个小项目,以此达到技术总结的意义。
# 1 产品列表
- 页面布局,用纯天然的
HTML+CSS就好了。 - 用插值和计算属性,输出产品总数量。
- 用
v-for循环渲染,输出产品信息。 - 用
v-if判断产品规格是否为空。 - 用
v-on(缩写@)进行事件绑定。
<!DOCTYPE html>
<html>
<head>
    <meta charset="UTF-8">
    <title>Vue3.0小项目实战</title>
    <script src="https://unpkg.com/vue@next"></script>
    <style>
        h1 {
            text-align: center;
            color: darkorange;
            margin-top: 30px;
        }

        .counter {
            text-align: center;
            margin-bottom: 5px;
        }


        table {
            width: 800px;
            margin: 0 auto;
            text-align: center;
        }

        td, th {
            border: 1px solid #bcbcbc;
            padding: 5px 10px;
        }

        th {
            background: #42b983;
            font-size: 1.2rem;
            font-weight: 400;
            color: #fff;
            cursor: pointer;
        }

        tr:nth-of-type(odd) {
            background: #fff;
        }

        tr:nth-of-type(even) {
            background: #eee;
        }

        .del {
            color: red;
        }

        input {
            border: 1px solid darkcyan;
            line-height: 25px;
            width: 200px;
            color: #000;
            font-weight: bold;
            margin-top: 5px;
            margin-left: 10px;
        }
    </style>
</head>
<body>
<div id="app">
    <h1>产品信息列表</h1>
    <div class="counter">共有<strong>{{ counter }}</strong>件产品</div>
    <table>
        <thead>
        <tr>
            <th>序号</th>
            <th>名称</th>
            <th>型号</th>
            <th>规格</th>
            <th>操作</th>
        </tr>
        </thead>
        <template v-for="(product,index) in products" :key="index">
            <tr>
                <td>
                    {{ index + 1 }}
                </td>
                <td>
                    {{ product.name }}
                </td>
                <td>
                    {{ product.type }}
                </td>
                <td>
                <span v-if="product.desc==''">
                 未填写规格
                </span>
                <span v-else>
                   {{ product.desc }}
                </span>
                </td>
                <td>
                    <button class="del" @click='del(index)'>删除</button>
                </td>
            </tr>
        </template>
    </table>
</div>
<script>
    // const { createApp } = Vue
    // createApp({...})
    Vue.createApp({
        data() {
            return {
                product: {
                    name: 沉梦听雨
                    type: '',
                    desc: '',
                },
                products: [
                    {name: '安卓手机', type: 'AZ321', desc: '6.8寸'},
                    {name: '苹果手机', type: 'PG222', desc: '4.8寸'},
                    {name: '安卓平板', type: 'PB666', desc: '9.8寸'},
                    {name: '二手电视', type: 'ER659', desc: '12寸'},
                    {name: '洗衣机', type: 'XY872', desc: '9.8斤'}
                ]
            }
        },
        computed: {
            counter() {
                return this.products.length
            }
        },

        methods: {
            //删除数据
            del(index) {
                this.products.splice(index, 1)
            }
        }
    }).mount("#app")
</script>
</body>
</html>
2
3
4
5
6
7
8
9
10
11
12
13
14
15
16
17
18
19
20
21
22
23
24
25
26
27
28
29
30
31
32
33
34
35
36
37
38
39
40
41
42
43
44
45
46
47
48
49
50
51
52
53
54
55
56
57
58
59
60
61
62
63
64
65
66
67
68
69
70
71
72
73
74
75
76
77
78
79
80
81
82
83
84
85
86
87
88
89
90
91
92
93
94
95
96
97
98
99
100
101
102
103
104
105
106
107
108
109
110
111
112
113
114
115
116
117
118
119
120
121
122
123
124
125
126
127
128
129
130
131
132
133
134
135
136
137
# 2 新增产品
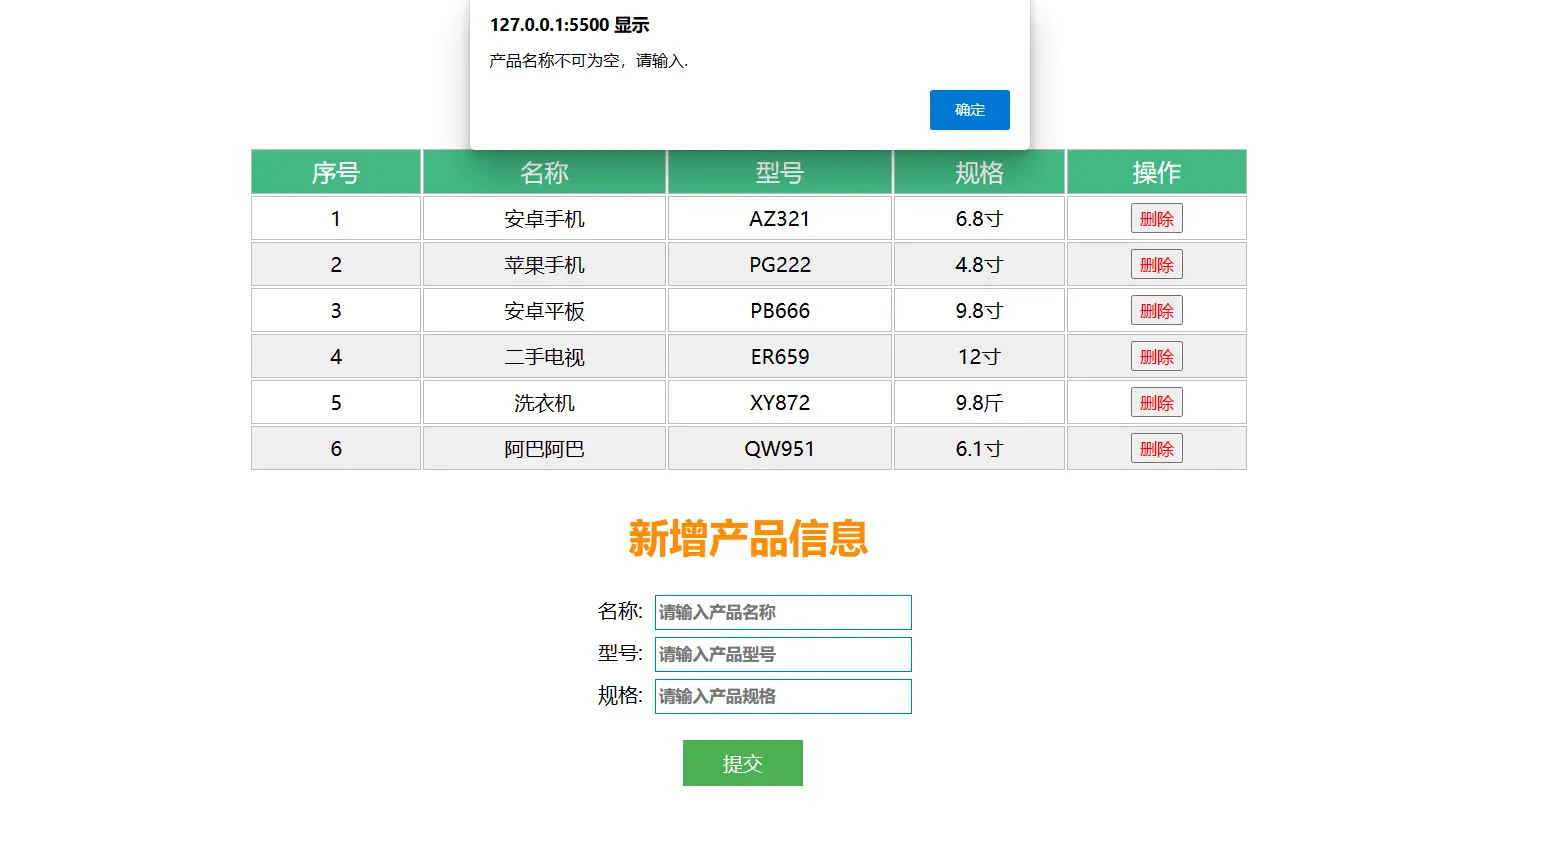
在新增表单布局代码,实现新增产品功能的布局。
- 用
v-model指令,进行表单数据双向绑定; - 用
v-on(缩写@)进行事件绑定。 - 在
method里面添加add函数,进行表单是否为空校验,不通过就进行提示,通过就将信息添加到产品信息列表中。
<!DOCTYPE html>
<html>
<head>
    <meta charset="UTF-8">
    <title>Vue3.0小项目实战</title>
    <script src="https://unpkg.com/vue@next"></script>
    <style>
        h1 {
            text-align: center;
            color: darkorange;
            margin-top: 30px;
        }

        .counter {
            text-align: center;
            margin-bottom: 5px;
        }


        table {
            width: 800px;
            margin: 0 auto;
            text-align: center;
        }

        td, th {
            border: 1px solid #bcbcbc;
            padding: 5px 10px;
        }

        th {
            background: #42b983;
            font-size: 1.2rem;
            font-weight: 400;
            color: #fff;
            cursor: pointer;
        }

        tr:nth-of-type(odd) {
            background: #fff;
        }

        tr:nth-of-type(even) {
            background: #eee;
        }

        .del {
            color: red;
        }

        input {
            border: 1px solid darkcyan;
            line-height: 25px;
            width: 200px;
            color: #000;
            font-weight: bold;
            margin-top: 5px;
            margin-left: 10px;
        }

        .add {
            width: 800px;
            margin: 0 auto;
            text-align: center;
        }

        .addBtn {
            background-color: #4CAF50; /* Green */
            border: none;
            color: white;
            padding: 8px 32px;
            font-size: 16px;
            margin-right: 10px;
        }
    </style>
</head>
<body>
<div id="app">
    <h1>产品信息列表</h1>
    <div class="counter">共有<strong>{{ counter }}</strong>件产品</div>
    <table>
        <thead>
        <tr>
            <th>序号</th>
            <th>名称</th>
            <th>型号</th>
            <th>规格</th>
            <th>操作</th>
        </tr>
        </thead>
        <template v-for="(product,index) in products" :key="index">
            <tr>
                <td>
                    {{ index + 1 }}
                </td>
                <td>
                    {{ product.name }}
                </td>
                <td>
                    {{ product.type }}
                </td>
                <td>
                <span v-if="product.desc==''">
                 未填写规格
                </span>
                <span v-else>
                   {{ product.desc }}
                </span>
                </td>
                <td>
                    <button class="del" @click='del(index)'>删除</button>
                </td>
            </tr>
        </template>
    </table>
    <div class="add">
        <h1>新增产品信息</h1>
        <div style="margin-left: 10px">
            名称:<input name="name" type="text" v-model="product.name"
                      placeholder="请输入产品名称"/><br/>
            型号:<input name="type" type="text" v-model="product.type"
                      placeholder="请输入产品型号"/><br/>
            规格:<input name="desc" type="text" v-model="product.desc"
                      placeholder="请输入产品规格"/>
        </div>
        <br/>
        <button class="addBtn" type="submit" @click="add()">提交</button>
    </div>
</div>
<script>
    Vue.createApp({
        data() {
            return {
                product: {
                    name: 沉梦听雨
                    type: '',
                    desc: '',
                },
                products: [
                    {name: '安卓手机', type: 'AZ321', desc: '6.8寸'},
                    {name: '苹果手机', type: 'PG222', desc: '4.8寸'},
                    {name: '安卓平板', type: 'PB666', desc: '9.8寸'},
                    {name: '二手电视', type: 'ER659', desc: '12寸'},
                    {name: '洗衣机', type: 'XY872', desc: '9.8斤'}
                ]
            }
        },
        computed: {
            counter() {
                return this.products.length
            }
        },

        methods: {
            // 删除数据
            del(index) {
                this.products.splice(index, 1)
            },
            // 添加数据
            add() {
                if (this.product.name.trim() == '') {
                    alert('产品名称不可为空,请输入.')
                } else if (this.product.type.trim() == '') {
                    alert('产品型号不可为空,请输入.')
                } else {
                    this.products.push(this.product)
                    this.product = {}
                }
            }
        }
    }).mount("#app")
</script>
</body>
</html>
2
3
4
5
6
7
8
9
10
11
12
13
14
15
16
17
18
19
20
21
22
23
24
25
26
27
28
29
30
31
32
33
34
35
36
37
38
39
40
41
42
43
44
45
46
47
48
49
50
51
52
53
54
55
56
57
58
59
60
61
62
63
64
65
66
67
68
69
70
71
72
73
74
75
76
77
78
79
80
81
82
83
84
85
86
87
88
89
90
91
92
93
94
95
96
97
98
99
100
101
102
103
104
105
106
107
108
109
110
111
112
113
114
115
116
117
118
119
120
121
122
123
124
125
126
127
128
129
130
131
132
133
134
135
136
137
138
139
140
141
142
143
144
145
146
147
148
149
150
151
152
153
154
155
156
157
158
159
160
161
162
163
164
165
166
167
168
169
170
171
172
173
174
运行结果为:
# UI 组件库
实际项目中通常使用现成的 UI 组件库来加速开发。下面介绍 Element Plus 和 Ant Design Vue 两款主流组件库。
# 组件库 element+
# 官网
一个 Vue 3 UI 框架 | Element Plus (element-plus.org) (opens new window)
element+ 是开源的前端组件库,有众多开发者在应用,是业界主流的 Web 端组件库之一。它有多个高质量组件,覆盖前端各类场景。性能极佳。组件体积小,支持主题定制和国际化等常用功能。element+ 可以友好的支持 Vue3.0。
# 1 安装 element+
虽然现在流行用 npm 命令、用所谓的脚手架创建项目,用命令行运行项目的方法,但我依然认为在学习阶段,应该怎么简单怎么来,最好不要在配置上浪费时间,消磨学习的兴趣。所以我推荐你直接用引入 CSS 和 JS 的方式。
<!DOCTYPE html>
<html>
<head>
    <meta charset="UTF-8">
    <title>ElementPlus组件库</title>
    <!-- Import style 引入样式文件 -->
    <link rel="stylesheet" href="//unpkg.com/element-plus/dist/index.css" />
    <!-- Import Vue 3 -->
    <!-- <script src="vue.global.js"></script> -->
    <script src="//unpkg.com/vue@3"></script>
    <!-- Import component library 引入组件库 -->
    <script src="//unpkg.com/element-plus"></script>
</head>
<body>
<div id="app">
    <el-row>
        <el-button>默认按钮</el-button>
        <el-button type="primary">主要按钮</el-button>
        <el-button type="success">成功按钮</el-button>
        <el-button type="info">信息按钮</el-button>
        <el-button type="warning">警告按钮</el-button>
        <el-button type="danger">危险按钮</el-button>
    </el-row>
</div>
<script>
    const app = Vue.createApp({});
    app.use(ElementPlus);
    app.mount("#app");
</script>
</body>
</html>
2
3
4
5
6
7
8
9
10
11
12
13
14
15
16
17
18
19
20
21
22
23
24
25
26
27
28
29
30
31
# 2 来点不一样的
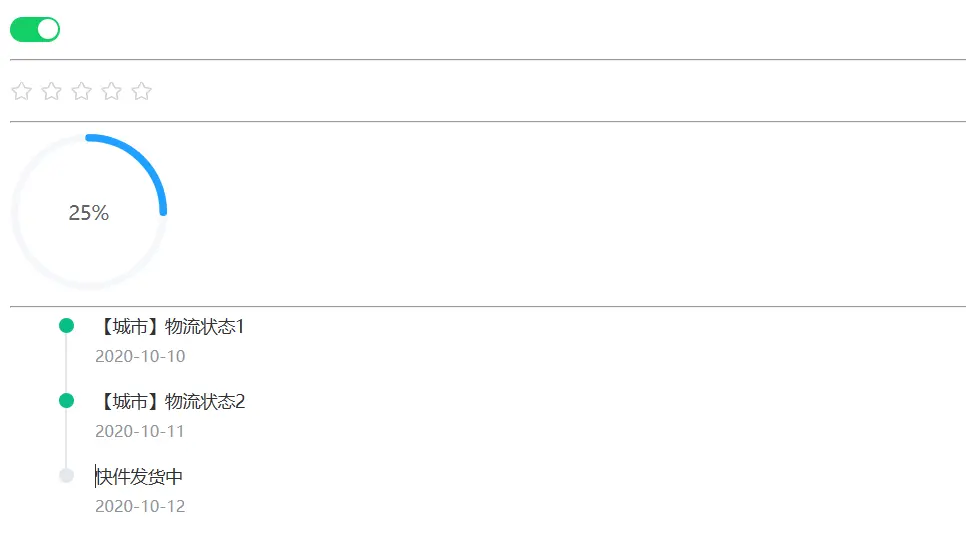
习惯了 HTML 的那些常规标签,总想找点不一样的,这下有了 element+,就可以实现了。我们来个不一样的选择标签,来个评分打星标签,再来一个物流进度时间线。
<!DOCTYPE html>
<html>
<head>
    <meta charset="UTF-8">
    <title>ElementPlus组件库</title>
    <!-- Import style -->
    <link rel="stylesheet" href="//unpkg.com/element-plus/dist/index.css" />
    <!-- Import Vue 3 -->
    <script src="vue.global.js"></script>
    <!-- Import component library -->
    <script src="//unpkg.com/element-plus"></script>
</head>
<body>
    <div id="app">
        <el-switch v-model="v1" active-color="#13ce66" inactive-color="#ff4949">
        </el-switch>
        <hr />
        <el-rate v-model="v2"></el-rate>
        <hr />
        <el-progress type="circle" :percentage="25"></el-progress>
        <br /><hr />
        <el-timeline>
            <el-timeline-item v-for="(activity, index) in activities" :key="index" :timestamp="activity.timestamp"
                :color="activity.color">
                {{activity.content}}
            </el-timeline-item>
        </el-timeline>
    </div>
    <script>
        const app = Vue.createApp({
            data() {
                return {
                    v1: true,
                    v2: '',
                    activities: [{
                        content: '【城市】物流状态1',
                        timestamp: '2020-10-10',
                        color: '#0bbd87'
                    }, {
                        content: '【城市】物流状态2',
                        timestamp: '2020-10-11',
                        color: '#0bbd87'
                    }, {
                        content: '快件发货中',
                        timestamp: '2020-10-12'
                    }]
                }
            }
        });
        app.use(ElementPlus);
        app.mount("#app");
    </script>
</body>
</html>
2
3
4
5
6
7
8
9
10
11
12
13
14
15
16
17
18
19
20
21
22
23
24
25
26
27
28
29
30
31
32
33
34
35
36
37
38
39
40
41
42
43
44
45
46
47
48
49
50
51
52
53
54
运行结果:
# 1) Antdv
添加必要插件
npm install ant-design-vue
- ant-design-vue 组件库插件
引入 antdv 功能,修改 main.ts
import { createApp } from 'vue'
import './style.css'
import App from './App.vue'
import antd from 'ant-design-vue'
import 'ant-design-vue/dist/antd.css'

createApp(App).use(antd).mount('#app')
2
3
4
5
6
7
# 表格
<template>
  <!-- <a-table :columns="columns" :dataSource="students" rowKey="id"></a-table> -->
  <a-table :columns="columns" :dataSource="students" :rowKey="rowKey"></a-table>
</template>
<script setup lang="ts">
import axios from "../api/request";
import { ref, computed } from "vue";
import { useRequest } from "vue-request";
import { AxiosRespList, Student } from "../model/Model8080";

const {data} = useRequest<AxiosRespList<Student>>(
  ()=>axios.get('/api/students')
)

const students = computed(()=>{
  return data.value?.data.data || []
})

function rowKey(r:Student) {
  return r.id
}

const columns = ref([
  {
    title:'编号',
    dataIndex:'id'
  },
  {
    title:'姓名',
    dataIndex:'name'
  },
  {
    title:'性别',
    dataIndex:'sex'
  },
  {
    title:'年龄',
    dataIndex:'age'
  }
])
</script>
2
3
4
5
6
7
8
9
10
11
12
13
14
15
16
17
18
19
20
21
22
23
24
25
26
27
28
29
30
31
32
33
34
35
36
37
38
39
40
41
# 分页
<template>
  <a-table :columns="columns" :data-source="students" row-key="id"
   :pagination="pagination" @change="tableChange"></a-table>
</template>
<script setup lang="ts">
import axios from "../api/request";
import { ref, computed } from "vue";
import { usePagination } from "vue-request";
import { AxiosRespPage, Student, StudentQueryDto } from "../model/Model8080";
import { PaginationProps } from "ant-design-vue";
import DateBody from "ant-design-vue/lib/vc-picker/panels/DatePanel/DateBody";

const dto = ref({page: 1, size: 5})

const {data, total, run} = usePagination<AxiosRespPage<Student>, StudentQueryDto[]>(
  (d)=> axios.get('/api/students/q', {params:d}),
  {
    defaultParams: [dto.value],
    pagination: {
      currentKey: "page",
      pageSizeKey: 'size',
      totalKey: 'data.data.total'
    }
  }
)

// 在页号或页大小改变时调用
function tableChange(pagination: PaginationProps) {
  console.log(pagination)
  dto.value.page = pagination.current ?? 1
  dto.value.size = pagination.pageSize ?? 5
  run(dto.value)
}

const pagination = computed<PaginationProps>(()=>{
  return {
    current: dto.value.page, // 当前页
    pageSize: dto.value.size, // 页大小
    total: total.value,       // 总记录数
    showSizeChanger: true,    // 显示页大小的下拉列表
    pageSizeOptions: ["1","2","3","4","5"] // 自定义下拉列表内容
  }
})

const students = computed(()=>{
  return data.value?.data.data.list || []
})

const columns = ref([
  {
    title: "编号",
    dataIndex: "id",
  },
  {
    title: "姓名",
    dataIndex: "name",
  },
  {
    title: "性别",
    dataIndex: "sex",
  },
  {
    title: "年龄",
    dataIndex: "age",
  },
]);
</script>
2
3
4
5
6
7
8
9
10
11
12
13
14
15
16
17
18
19
20
21
22
23
24
25
26
27
28
29
30
31
32
33
34
35
36
37
38
39
40
41
42
43
44
45
46
47
48
49
50
51
52
53
54
55
56
57
58
59
60
61
62
63
64
65
66
67
# 搜索、删除
<template>
  <a-row>
    <a-col :span="2">
      <a-button type="primary" size="small">新增</a-button>
    </a-col>
    <a-col :span="4">
      <a-popconfirm title="确认要删除选中学生吗?"
        ok-text="确定" cancel-text="取消" @confirm="onDeleteIds"
        @visibleChange="onVisibleChange" :visible="visible">
        <a-button type="primary" size="small">删除选中</a-button>
      </a-popconfirm>
    </a-col>
    <a-col :span="4">
    </a-col>
    <a-col :span="4">
      <a-input v-model:value="dto.name" placeholder="输姓名" size="small"></a-input>
    </a-col>
    <a-col :span="4">
      <a-select v-model:value="dto.sex" placeholder="选性别" :allowClear="true" size="small">
        <a-select-option value="男">男</a-select-option>
        <a-select-option value="女">女</a-select-option>
      </a-select>
    </a-col>
    <a-col :span="4">
      <a-select v-model:value="dto.age" placeholder="选年龄" :allowClear="true" size="small">
        <a-select-option value="0,20">20以下</a-select-option>
        <a-select-option value="21,30">21~30</a-select-option>
        <a-select-option value="31,40">31~40</a-select-option>
        <a-select-option value="40,120">40以上</a-select-option>
      </a-select>
    </a-col>
    <a-col :span="2">
      <a-button @click="tableChange" type="primary" size="small">搜索</a-button>
    </a-col>
  </a-row>
  <hr>
  <a-table :columns="columns" :data-source="students" row-key="id"
    :pagination="pagination" @change="tableChange"
    :row-selection="{selectedRowKeys:ids,onChange:onSelectChange}">
    <template #bodyCell="{column, record}">
      <template v-if="column.dataIndex==='name'">
      {{record.name + (record.sex==='男'?'(大侠)':'(女侠)')}}
      </template>

      <template v-else-if="column.dataIndex==='operation'">
      <a>修改</a>
      <a-divider type="vertical"></a-divider>
      <a-popconfirm title="确认要删除该学生吗?"
        ok-text="确定" cancel-text="取消" @confirm="onDelete(record.id)">
        <a>删除</a>
      </a-popconfirm>
      </template>
    </template>
  </a-table>

</template>
<script setup lang="ts">
import axios from "../api/request";
import { ref, computed } from "vue";
import { usePagination, useRequest } from "vue-request";
import { AxiosRespPage, AxiosRespString, Student, StudentQueryDto } from "../model/Model8080";
import { PaginationProps } from "ant-design-vue";

// >>>>>>>>>>>>>> 搜索功能开始
const dto = ref({page: 1, size: 5, name: '', sex: null, age: null})

const {data, total, run: search} = usePagination<AxiosRespPage<Student>, StudentQueryDto[]>(
  (d) => axios.get('/api/students/q', {params:d}),
  {
    defaultParams: [dto.value],
    pagination: {
      currentKey: "page",
      pageSizeKey: 'size',
      totalKey: 'data.data.total'
    }
  }
)

function tableChange(pagination: PaginationProps) {
  // console.log(pagination)
  dto.value.page = pagination.current ?? 1
  dto.value.size = pagination.pageSize ?? 5
  search(dto.value)
}

const pagination = computed<PaginationProps>(()=>{
  return {
    current: dto.value.page, // 当前页
    pageSize: dto.value.size, // 页大小
    total: total.value,       // 总记录数
    showSizeChanger: true,    // 显示页大小的下拉列表
    pageSizeOptions: ["1","2","3","4","5"] // 自定义下拉列表内容
  }
})

const students = computed(()=>{
  return data.value?.data.data.list || []
})
// <<<<<<<<<<<<<< 搜索功能结束


// >>>>>>>>>>>>>> 删除功能开始
async function onDelete(id:number) {
  // console.log("学生id是:"+id)
  await deleteById(id)      // 删除请求 删除响应
  search(dto.value)        //                   查询请求 查询响应
}

const { runAsync: deleteById } = useRequest<AxiosRespString, number[]>(
  (id) => axios.delete(`/api/students/${id}`),
  {
    manual: true
  }
)
// <<<<<<<<<<<<<< 删除功能结束

// >>>>>>>>>>>>>> 删除选中开始
const ids = ref<number[]>([])

function onSelectChange(keys:number[]) {
  // console.log(keys)
  ids.value = keys
}

async function onDeleteIds() {
  await deleteByIds(ids.value)
  ids.value = []
  search(dto.value)
}

const { runAsync: deleteByIds } = useRequest<AxiosRespString, number[][]>(
  (ids)=>axios.delete('/api/students', {data: ids}),
  {
    manual: true
  }
)

const visible = ref(false)

function onVisibleChange(v:boolean) {
  if(!v) { // 希望隐藏
    visible.value = false
  } else { // 希望显示
    visible.value = ids.value.length > 0
  }
}
// <<<<<<<<<<<<<< 删除选中结束

const columns = ref([
  {
    title: "编号",
    dataIndex: "id",
  },
  {
    title: "姓名",
    dataIndex: "name",
  },
  {
    title: "性别",
    dataIndex: "sex",
  },
  {
    title: "年龄",
    dataIndex: "age",
  },
  {
    title: '操作',
    dataIndex: 'operation'
  }
]);
</script>
<style scoped>
  .ant-input, .ant-select {
    width: 80px;
  }
</style>
2
3
4
5
6
7
8
9
10
11
12
13
14
15
16
17
18
19
20
21
22
23
24
25
26
27
28
29
30
31
32
33
34
35
36
37
38
39
40
41
42
43
44
45
46
47
48
49
50
51
52
53
54
55
56
57
58
59
60
61
62
63
64
65
66
67
68
69
70
71
72
73
74
75
76
77
78
79
80
81
82
83
84
85
86
87
88
89
90
91
92
93
94
95
96
97
98
99
100
101
102
103
104
105
106
107
108
109
110
111
112
113
114
115
116
117
118
119
120
121
122
123
124
125
126
127
128
129
130
131
132
133
134
135
136
137
138
139
140
141
142
143
144
145
146
147
148
149
150
151
152
153
154
155
156
157
158
159
160
161
162
163
164
165
166
167
168
169
170
171
172
173
174
175
176
# 新增、修改
子组件
<template>
  <a-modal :visible="visible" :title="title"
    @ok="onOk" @cancel="onCancel">
    <a-form>
      <a-form-item label="编号" v-if="id">
        <a-input readonly v-model:value="id"></a-input>
      </a-form-item>
      <a-form-item label="姓名">
        <a-input v-model:value="dto.name"></a-input>
      </a-form-item>
      <a-form-item label="性别">
        <a-radio-group v-model:value="dto.sex">
          <a-radio-button value="男">男</a-radio-button>
          <a-radio-button value="女">女</a-radio-button>
        </a-radio-group>
      </a-form-item>
      <a-form-item label="年龄">
        <a-input-number v-model:value="dto.age"></a-input-number>
      </a-form-item>
    </a-form>
  </a-modal>
</template>
<script setup lang="ts">
import axios from "../api/request";
import { ref, computed } from "vue";
import { useRequest } from "vue-request";
import { StudentSaveDto, AxiosRespString } from "../model/Model8080";
import { Form } from 'ant-design-vue'

// 定义属性
const props = defineProps<{id:number, dto:StudentSaveDto, visible:boolean}>()

const title = computed(()=> props.id===0?'新增学生':'修改学生')

// 定义事件
const emit = defineEmits(['update:visible', 'saved'])

async function onOk() {
  if(props.id === 0) {
    await insert(props.dto)
  } else {
    await update(props.dto)
  }
  emit('saved')
  // 发送事件给父组件, 希望把 visible 改为 false
  emit('update:visible', false)
}

function onCancel() {
  // 发送事件给父组件, 希望把 visible 改为 false
  emit('update:visible', false)
}

const {runAsync:insert} = useRequest<AxiosRespString,StudentSaveDto[]>(
  (dto)=>axios.post('/api/students', dto),
  {
    manual: true
  }
)

const {runAsync:update} = useRequest<AxiosRespString,StudentSaveDto[]>(
  (dto)=>axios.put(`/api/students/${props.id}`, dto),
  {
    manual: true
  }
)
</script>
2
3
4
5
6
7
8
9
10
11
12
13
14
15
16
17
18
19
20
21
22
23
24
25
26
27
28
29
30
31
32
33
34
35
36
37
38
39
40
41
42
43
44
45
46
47
48
49
50
51
52
53
54
55
56
57
58
59
60
61
62
63
64
65
66
67
父组件使用子组件
<A4Save :id="id" :dto="saveDto" v-model:visible="saveVisible"></A4Save>

<script setup lang="ts">
// ...
// >>>>>>>>>>>>>> 新增、修改开始
const saveVisible = ref(false)
const id = ref(0)
const saveDto = reactive({name:'', sex:'男', age:18})

function onInsert() {
  saveVisible.value = true
  id.value = 0
  Object.assign(saveDto, {name:'', sex:'男', age:18})
}

function onUpdate(record: Student) {
  saveVisible.value = true
  id.value = record.id
  Object.assign(saveDto, record)
}

function onSaved() {
  search(dto.value)
}
// <<<<<<<<<<<<<< 新增、修改结束
</script>
2
3
4
5
6
7
8
9
10
11
12
13
14
15
16
17
18
19
20
21
22
23
24
25
26
saveDto 使用 reactive 包装,是为了解决后续表单校验失效问题
Object.assign 是将源对象(参数2)的属性值赋值给目标对象(参数1)的同名属性,效果等价于
saveDto.name = record.name
saveDto.sex = record.sex
saveDto.age = record.age
1
2
3
# 全局消息
在 request.ts 中对响应消息统一处理
import { message } from 'ant-design-vue'

// ...
// 响应拦截器
_axios.interceptors.response.use(
  (response)=>{ // 状态码  2xx
    if(response.data.message) {
      message.success(response.data.message, 3)
    }
    // ...
  },
  (error)=>{ // 状态码 > 2xx, 400,401,403,404,500
    // ...
  }
)
2
3
4
5
6
7
8
9
10
11
12
13
14
15
# 表单校验
<template>
  <a-modal :visible="visible" :title="title"
    @ok="onOk" @cancel="onCancel">
    <a-form>
      <a-form-item label="编号" v-if="id">
        <a-input readonly v-model:value="id"></a-input>
      </a-form-item>
      <a-form-item label="姓名" v-bind="validateInfos.name">
        <a-input v-model:value="dto.name"></a-input>
      </a-form-item>
      <a-form-item label="性别" v-bind="validateInfos.sex">
        <a-radio-group v-model:value="dto.sex">
          <a-radio-button value="男">男</a-radio-button>
          <a-radio-button value="女">女</a-radio-button>
        </a-radio-group>
      </a-form-item>
      <a-form-item label="年龄" v-bind="validateInfos.age">
        <a-input-number v-model:value="dto.age"></a-input-number>
      </a-form-item>
    </a-form>
  </a-modal>
</template>
<script setup lang="ts">
import axios from "../api/request";
import { ref, computed } from "vue";
import { useRequest } from "vue-request";
import { StudentSaveDto, AxiosRespString } from "../model/Model8080";
import { Form } from 'ant-design-vue'

// 定义属性
const props = defineProps<{id:number, dto:StudentSaveDto, visible:boolean}>()

const title = computed(()=> props.id===0?'新增学生':'修改学生')

// 定义事件
const emit = defineEmits(['update:visible', 'saved'])

async function onOk() {
  try {
    // 提交前校验
    await validate()
    if(props.id === 0) {
      await insert(props.dto)
    } else {
      await update(props.dto)
    }
    emit('saved')
    // 发送事件给父组件, 希望把 visible 改为 false
    emit('update:visible', false)
  } catch (e) {
    console.error(e)
  }
}

function onCancel() {
  // 发送事件给父组件, 希望把 visible 改为 false
  emit('update:visible', false)
}

const {runAsync:insert} = useRequest<AxiosRespString,StudentSaveDto[]>(
  (dto)=>axios.post('/api/students', dto),
  {
    manual: true
  }
)

const {runAsync:update} = useRequest<AxiosRespString,StudentSaveDto[]>(
  (dto)=>axios.put(`/api/students/${props.id}`, dto),
  {
    manual: true
  }
)

const rules = ref({
  name: 沉梦听雨
    {required: true, message:'姓名必须'},
    {min:2, message:'字符数至少为2'}
  ],
  sex: [
    {required: true, message:'性别必须'}
  ],
  age: [
    {required: true, message:'年龄必须'},
    {min:10, message:'年龄最小为10岁', type:'number'},
    {max:120, message:'年龄最大为120岁', type:'number'}
  ]
})

// 参数1: 待校验的数据
// 参数2: 校验规则
const { validateInfos, validate } = Form.useForm(props.dto, rules)
</script>
2
3
4
5
6
7
8
9
10
11
12
13
14
15
16
17
18
19
20
21
22
23
24
25
26
27
28
29
30
31
32
33
34
35
36
37
38
39
40
41
42
43
44
45
46
47
48
49
50
51
52
53
54
55
56
57
58
59
60
61
62
63
64
65
66
67
68
69
70
71
72
73
74
75
76
77
78
79
80
81
82
83
84
85
86
87
88
89
90
91
92
# 电子地图
在大数据时代,用电子地图展示数据的需求,已成为常规需求。
其实,用电子地图,完全可以不用管 Vue 的,直接用 Javascript 就可以实现。
# 1 获取 Appkey
- 用你的百度账号,登录到百度 API key 的申请地址 https://lbsyun.baidu.com/apiconsole/key/create (opens new window)
- 登录成功后,如果没有直接导航到【创建应用】节点的话,就手动点击【创建应用】。(在控制台中)
- 填写应用名称:sales,应用类型:浏览器端。启用服务:全部勾上。Referer 白名单:填写半角*。
- 填写好后,点击【提交】按钮。
在返回的窗口中,会有 API key 这项内容,复制出来,保存在某个地方,稍后就会用到。
# 2 电子地图
代码里的 "你的key",改成你申请到的。仔细阅读代码,你会发现,这里和 Vue3.0 没半毛钱关系。
实现一个功能,看需求文档的要求,如果根本就不需要到 Vue3.0 的话,就不要硬用。好了,废话不多说,看代码吧。
<!DOCTYPE html>
<html lang="zh-CN">
<head>
    <meta charset="utf-8">
    <title>地图展示</title>
    <meta http-equiv="Content-Type" content="text/html; charset=utf-8">
    <meta name="viewport" content="initial-scale=1.0, user-scalable=no">
    <meta http-equiv="X-UA-Compatible" content="IE=Edge">
    <style>
        body,
        html,
        #container {
            overflow: hidden;
            width: 100%;
            height: 100%;
            margin: 0;
            font-family: "微软雅黑";
        }
    </style>
    <script src="//api.map.baidu.com/api?type=webgl&v=1.0&ak=C3DLtVXcGrWnRzFRg8QglHIst2M87Dfx">
    </script>
</head>
<body>
<div id="container"></div>
</body>
</html>
<script>
    var map = new BMapGL.Map('container');
    map.centerAndZoom(new BMapGL.Point(102.54, 30.05), 12);
    map.enableScrollWheelZoom(true);
</script>
2
3
4
5
6
7
8
9
10
11
12
13
14
15
16
17
18
19
20
21
22
23
24
25
26
27
28
29
30
31