
 组件与响应式API
# 组件与响应式API
组件是 Vue 应用的构建块,响应式 API 是 Composition API 的核心。本章先介绍组合式 API 的概念,再讲解 ref 与 reactive 的用法,最后演示自定义组件的注册与使用。
# 组合式 API
Vue 3 的组合式 API 是一种新的 API 风格,用于编写 Vue 组件。
Vue 3 的组合式 API 基于函数式编程的思想,将组件的逻辑拆分为独立的功能单元,称为"组合函数"。这些组合函数可以通过 setup() 函数在组件中进行定义和使用。
使用组合式 API,可以将组件的相关逻辑聚合在一起,而不是按照选项属性(如 data、methods、computed 等)进行划分。这样可以更好地组织和管理组件的代码,使代码更具可读性和可维护性。
组合式 API 提供了以下几个主要的特性:
setup()函数:在组件中使用setup()函数来定义组合函数和其他响应式数据。setup()函数在组件创建之前执行,并且可以返回一个对象,该对象包含组合函数和其他数据。- 组合函数:组合函数是一种用于定义组件逻辑的函数。它可以包含数据、计算属性、方法等,并且可以使用 Vue 提供的响应式 API(如
ref、reactive等)来管理组件状态。 - 生命周期钩子函数:Vue 3 的组合式 API 引入了新的生命周期钩子函数,如
onMounted、onUpdated、onUnmounted等,用于在不同的组合函数中执行特定的操作。 - 自定义逻辑复用:通过将相关的组合函数提取为可复用的函数,可以在多个组件之间共享逻辑,并实现更好的代码复用性。
<!DOCTYPE html>
<html lang="en">
  <head>
    <meta charset="UTF-8" />
    <title>Vue 3 组合式 API 示例</title>
    <!-- <script src="https://unpkg.com/vue@next"></script> -->
    <script src="vue.global.js"></script>
  </head>
  <body>
    <div id="app">
      <p>当前计数值为:{{ count }}</p>
      <button @click="increment">增加</button>
      <button @click="decrement">减少</button>
    </div>

    <script>
      const { ref } = Vue;

      const app = Vue.createApp({
        setup() {
          // 使用 ref 定义 count 响应式数据
          const count = ref(0);

          // 定义增加计数的方法
          function increment() {
            count.value++;
          }

          // 定义减少计数的方法
          function decrement() {
            count.value--;
          }

          // 返回 count 和两个方法
          return {
            count,
            increment,
            decrement,
          };
        },
      });

      app.mount("#app");
    </script>
  </body>
</html>
2
3
4
5
6
7
8
9
10
11
12
13
14
15
16
17
18
19
20
21
22
23
24
25
26
27
28
29
30
31
32
33
34
35
36
37
38
39
40
41
42
43
44
45
46
# ref 与 reactive
Vue 提供了 ref 和 reactive 两个函数来创建响应式数据,下面通过 SFC 工程化项目演示。
# Vue 单文件组件(SFC)
Vue 的组件文件以 .vue 结尾,每个组件由三部分组成
<script setup lang="ts"></script>

<template></template>

<style scoped></style>
2
3
4
5
- script 代码部分,控制模板的数据来源和行为
- template 模板部分,由它生成 html 代码
- style 样式部分,一般不咋关心
根组件是 src/App.vue,先来个 Hello,world 例子
<script setup lang="ts">
import { ref } from "vue";
let msg = ref("hello"); // 把数据变成响应式的

function change() {
  msg.value = "world";
  console.log(msg);
}
</script>
<template>
  <h1>{{ msg }}</h1>
  <input type="button" value="修改msg" @click="change" />
</template>
2
3
4
5
6
7
8
9
10
11
12
13
- 用来把一个变量绑定到页面上某个位置
- 绑定的变量必须用 ref 函数来封装
- ref 返回的是【响应式】数据,即数据一旦变化,页面展示也跟着变化
# main.ts
import { createApp } from 'vue'
import './style.css'
import App from './App.vue'

createApp(App)
  .mount('#app')
2
3
4
5
6
- createApp 是创建一个 Vue 应用程序,它接收的参数 App 即之前我们看到的根组件
- mount 就是把根组件生成的 html 代码片段【挂载】到 index.html 中 id 为 app 的 html 元素上
可以修改自己的组件文件,挂载到主页面
新建 src/views/E0.vue,内容如下
<script setup lang="ts">
import { ref } from 'vue'
const msg = ref('Hello, World!!')
</script>
<template>
  <h1>{{ msg }}</h1>
</template>
2
3
4
5
6
7
修改 main.ts 将自己的组件文件挂载
import { createApp } from 'vue'
import './style.css'
// import App from './App.vue'
import E0 from './views/E0.vue'

createApp(E0).mount('#app')
2
3
4
5
6
- 以后我们用这样的方式演示课堂案例
打开浏览器控制台,进入 Vue 的开发工具,尝试做如下修改

当把 msg 的值由 "Hello, World" 改为 "你好" 时,会发现页面展示同步发生了变化
# ref 与 reactive的具体用法
vue 提供了两个函数,都可以将数据变为【响应式】的
<script setup lang="ts">
import { ref, reactive } from 'vue'
const msg = ref('Hello, World')
const user = reactive({ name: '张三' })
</script>

<template>
  <h2>{{msg}}</h2>
  <h2>{{user.name}}</h2>
</template>
2
3
4
5
6
7
8
9
10
- ref 能将任意类型的数据变为【响应式】的
- reactive 只能将对象类型变为【响应式】,对基本类型无效(例如 string,number,boolean)
还有一点不同
<script setup lang="ts">
import { ref, reactive } from 'vue'
const u1 = ref({ name: '张三' })
const u2 = reactive({ name: '张三' })

function test() {
  console.log(u1.value)
  console.log(u2)
}

test()
</script>

<template>
  <h2>{{u1.name}}</h2>
  <h2>{{u2.name}}</h2>
</template>
2
3
4
5
6
7
8
9
10
11
12
13
14
15
16
17
- 在 template 模板中使用 ref 包装的数据,直接写【变量名】就可以了
- 但在代码中要使用 ref 包装的数据,必须用【变量名.value】才能访问到
- reactive 包装的数据,在模板中和代码中都是一致的
# 自定义组件
组件可以扩展 HTML 元素,封装可重用的代码。先用 Options API 演示组件注册,再用 Composition API 演示 SFC 组件。
# Options API:组件注册
在一个页面中,如果有代码重复的内容,那你可以将其抽出来,用 Vue 注册成局部组件;在一个 Web 系统中,如果有多个页面有共同的代码,那你可以将其抽出来,用 Vue 注册成全局组件。
组件可以扩展 HTML 元素,封装可重用的代码。让我们可以用独立可复用的小组件来构建大型应用。
其实,如果你用第三方现成的组件库的话,自定义组件,用得很少,甚至不用,但这是一个知识点,还是学一下比较好。
# 1 局部注册
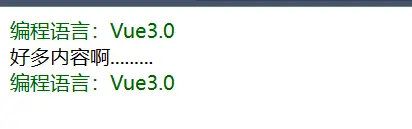
在一个页面中,将其重复的内容抽出来,注册成组件,比如 <demo>。在需要用的地方直接引进 <demo></demo> 这个组件即可,以此来达到复用的目标。
<!DOCTYPE html>
<html>
<head>
    <meta charset="UTF-8">
    <title>Vue3.0组件注册</title>
    <script src="vue.global.js"></script>
</head>
<body>
<div id="app">
    <demo></demo>
    好多内容啊.........<br/>
    <demo></demo>
</div>
<script>
    // 创建一个Vue 应用
    const app = Vue.createApp({})

    // 定义一个名为 demo 的新页面组件
    app.component('demo', {
        data() {
            return {
                lang: "Vue3.0"
            }
        },
        template: `<span style="color: darkgreen">
        编程语言:{{ lang }}</span><br/>`
    })
    app.mount('#app')
</script>
</body>
</html>
2
3
4
5
6
7
8
9
10
11
12
13
14
15
16
17
18
19
20
21
22
23
24
25
26
27
28
29
30
31
运行结果:
# 2 全局注册
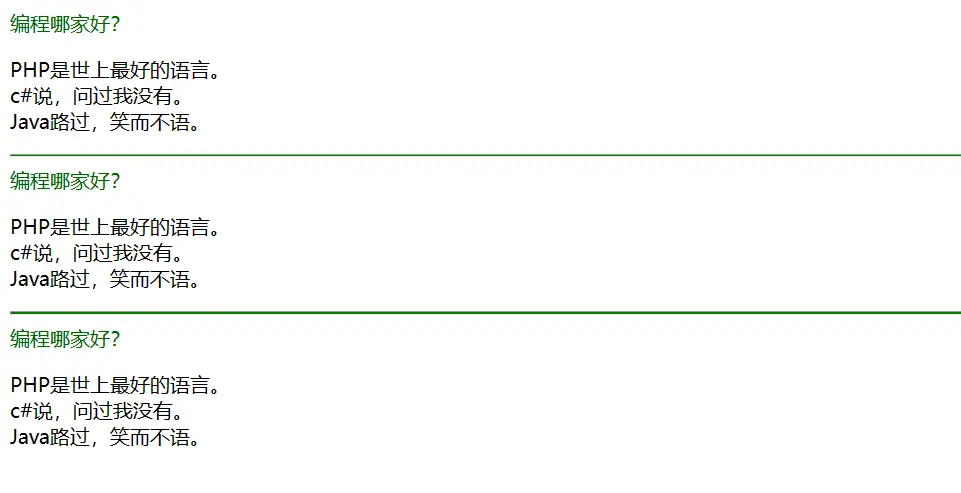
如果在整个 Web 系统中,有重复代码存在的话,那可以将共同的内容,放到一个 js 文件中。之后,在需要用到的页面进行引进即可。
const ComponentA = {
    template: `<span style="color: darkgreen">编程哪家好?</span>
        <p>
          PHP是世上最好的语言。<br/>
          c#说,问过我没有。<br/>
          Java路过,笑而不语。
        </p>`
}
2
3
4
5
6
7
8
html 页面文件内容,注意引进 c.js 文件。'lang' -- <lang></lang>
<!DOCTYPE html>
<html>
<head>
    <meta charset="UTF-8">
    <title>Vue3.0组件注册</title>
    <script src="vue.global.js"></script>
    <script src="c.js"></script>
</head>
<body>
<div id="app">
    <lang></lang>
    <hr style="background-color:green;height: 1px"/>
    <lang></lang>
    <hr style="background-color:green;height: 1px"/>
    <lang></lang>
</div>
<script>
    const app = Vue.createApp({
        components: {
            'lang': ComponentA
        }
    })
    app.mount('#app')
</script>
</body>
</html>
2
3
4
5
6
7
8
9
10
11
12
13
14
15
16
17
18
19
20
21
22
23
24
25
26
运行结果为:
# Composition API:子组件
# 例1
定义子组件 Child1
<template>
  <div class="container">
    <div class="card">
      <div>
        <p class="name">{{name}}</p>
        <p class="location">{{country}}</p>
      </div>
      <img :src="avatar || '/src/assets/vue.svg'"/>
    </div>
  </div>
</template>
<script setup lang="ts">
// 定义属性,  编译宏
defineProps<{name:string,country:string,avatar?:string}>()
</script>
<style scoped>
.container {
  width: 100%;
  display: flex;
  flex-wrap: wrap;
  justify-content: space-evenly;
  flex-direction: row-reverse;
}
.name {
  font-weight: bold;
}
.location {
  font-size: 0.8em;
  color: #6d597a;
}
.card {
  display: flex;
  justify-content: space-evenly;
  padding: 1em;
  margin: 1rem;
  border-radius: 5px;
  background: #fff;
  width: 200px;
  box-shadow: 0 14px 28px rgba(0, 0, 0, 0.25), 0 10px 10px rgba(0, 0, 0, 0.22);
}

.card:hover {
  transform: rotate(-5deg);
}

.card img {
  margin-left: 1em;
  border-radius: 50%;
  max-width: 55px;
  max-height: 55px;
}
</style>
2
3
4
5
6
7
8
9
10
11
12
13
14
15
16
17
18
19
20
21
22
23
24
25
26
27
28
29
30
31
32
33
34
35
36
37
38
39
40
41
42
43
44
45
46
47
48
49
50
51
52
父组件引用
<template>
  <Child1 name="张三" country="中国" avatar="/src/assets/vue.svg"></Child1>
  <Child1 name="李四" country="印度" avatar="/vite.svg"></Child1>
  <Child1 name="王五" country="韩国" ></Child1>
</template>
<script lang="ts" setup>
import Child1 from '../components/Child1.vue';
</script>
2
3
4
5
6
7
8
# 例2
首先添加类型说明 model/ModelRandomUser.ts
import { AxiosResponse } from "axios";
export interface AxiosRespResults extends AxiosResponse<Results>{}

export interface Results {
  info: {
    page: number,
    results: number
  },
  results: Result[]
}

export interface Result {
  gender: 'male' | 'female',
  name: 沉梦听雨
    first: string,
    last: string
  },
  location: {
    country: string
  },
  picture: {
    medium: string
  },
  login: {
    username: string
  }
}
2
3
4
5
6
7
8
9
10
11
12
13
14
15
16
17
18
19
20
21
22
23
24
25
26
27
子组件不变,父组件使用子组件
<!-- 父组件 -->
<template>
  <Child1 v-for="u of users"
    :name="u.name.first"
    :country="u.location.country"
    :avatar="u.picture.medium"
    :key="u.login.username"></Child1>
</template>
<script setup lang="ts">
import axios from "axios";
import { useRequest } from "vue-request";
import { computed } from "vue";
import { AxiosRespResults } from '../model/ModelRandomUser'
import Child1 from "../components/Child1.vue";

const { data } = useRequest<AxiosRespResults>(
  ()=>axios.get('https://randomuser.me/api/?results=3')
)

const users = computed(()=>{
  return data.value?.data.results || []
})
</script>
2
3
4
5
6
7
8
9
10
11
12
13
14
15
16
17
18
19
20
21
22
23
如果觉得 Result 数据结构嵌套太复杂,还可以做一个类型映射
<!-- 父组件 -->
<template>
  <Child1 v-for="u of users"
    :name="u.name"
    :country="u.country"
    :avatar="u.avatar"
    :key="u.username"></Child1>
</template>
<script setup lang="ts">
import axios from "axios";
import { useRequest } from "vue-request";
import { computed } from "vue";
import { AxiosRespResults, Result } from '../model/ModelRandomUser'
import Child1 from "../components/Child1.vue";

const { data } = useRequest<AxiosRespResults>(
  ()=>axios.get('https://randomuser.me/api/?results=3')
)

const users = computed(()=>{
  return data.value?.data.results.map(resultToUser) || []
})

interface User {
  name: 沉梦听雨
  country: string,
  avatar: string,
  username: string
}
function resultToUser(r:Result):User {
  return {
    name: 沉梦听雨
    country: r.location.country,
    avatar: r.picture.medium,
    username: r.login.username
  }
}
</script>
2
3
4
5
6
7
8
9
10
11
12
13
14
15
16
17
18
19
20
21
22
23
24
25
26
27
28
29
30
31
32
33
34
35
36
37
38
- resultToUser 将 Result 类型映射为 User 类型